This document explains how to start the project, how all components connect, how models and training work, firmware generation, firmware comparison, model accuracy, and what each screenshot shows.
venv)cd backend pip install -r requirements.txt uvicorn main:app --reload --host 0.0.0.0 --port 8000The API runs at
http://localhost:8000.
.\venv\bin\Activate.ps1
python main.py
On Windows with a
Scripts venv: .\venv\Scripts\Activate.ps1 then python main.py.
The window title will be Drone Firmware Tampering Detection. Ensure the status in the sidebar shows Connected so the app can talk to the backend.
High-level flow:
API_BASE_URL (default http://localhost:8000). The desktop and backend connect via this URL.So: Desktop (PySide6) ↔ APIClient ↔ Backend (FastAPI). Training is separate: it is done in the Jupyter notebook and writes model files that the desktop can use for local triage.
| File / Folder | Role |
|---|---|
main.py | Entry point; creates QApplication and MainWindow. |
config.py | API URL and timeouts; imported by api/client.py. |
api/client.py | APIClient used by all views and by main_window (for health check). |
views/main_window.py | Imports all views, builds nav and stack, wires _show("dashboard"|"upload"|...) and analysis_selected → detail. |
views/dashboard.py | Uses API to get stats and recent analyses; emits analysis_selected(firmware_id) to open detail. |
views/upload.py | Uses APIClient to upload and analyze; model choice (ensemble, etc.) sent to analyze_firmware. |
views/analyses.py | Lists analyses via API; clicking a row emits analysis_selected so main_window shows detail. |
views/analysis_detail.py | Loads one analysis by ID via API; can call get_analysis_features, generate report, run local triage via utils/local_model. |
views/research_view.py | Compares two firmware files: uploads both, runs analysis on each, shows baseline vs modified result (firmware comparison). |
views/generator.py | Contains FirmwareGenerator and GeneratorView UI; generates firmware binaries and saves to a folder. |
utils/local_model.py | Loads models/drone_firmware_lr.joblib, scaler, metadata; provides local_predict and get_local_feature_importance for analysis detail. |
backend/main.py | Implements all API routes; stores uploads under backend/uploads/ and analysis results in memory. |
drone_firmware_training.ipynb | Loads DJI dataset, cleans/encodes, trains Logistic Regression (and optional XGBoost), saves model/scaler/metadata to models/. |
models/ | Holds drone_firmware_lr.joblib, drone_firmware_scaler.joblib, drone_firmware_metadata.joblib produced by the notebook. |
The system uses two places where “models” appear:
rf, lr) had run. The desktop sends model_preference (e.g. ensemble, random_forest, lstm, autoencoder) in the analyze request. The current backend returns a single mock result with optional per_model_results and uncertainty_score for the UI.models/. The analysis detail view can run a “Run local check” that uses utils/local_model.local_predict(features) and shows Local vs Server and Agree/Disagree.| Model | Usefulness |
|---|---|
| Ensemble | Combines several models (e.g. RF + LR) to reduce variance and improve robustness; good for tamper vs clean with limited data. |
| Random Forest (rf) | Handles mixed and categorical features, gives feature importance, less overfitting than a single tree. |
| Logistic Regression (lr) | Simple, interpretable coefficients (explainability), stable with regularization; used as the saved local model. |
| LSTM | Designed for sequences; useful if firmware is treated as a sequence of bytes or chunks (optional/advanced). |
| Autoencoder | Unsupervised; learns “normal” firmware and flags anomalies (tampered) by reconstruction error; useful when labels are scarce. |
The UI shows per-model results (e.g. rf: clean 21.4%, lr: clean 19.5%) and feature importance (e.g. risk_score, verification_passed, section_count, entropy_score) so you can see how each model contributes and which features drive the decision.
Training is done entirely in drone_firmware_training.ipynb, not in the desktop or backend.
dataset/dji_firmware_dataset_v2/dji_firmware_dataset/ (train.csv, val.csv, test.csv).LabelEncoder.label (0 = clean, 1 = tampered).LogisticRegression(C=0.1, class_weight='balanced') on scaled features (StandardScaler), evaluates on train/val/test (accuracy, precision, recall, F1, AUC).models/drone_firmware_*.joblib. The desktop’s local triage uses these files.Accuracy is computed in the notebook on the train/val/test sets after training. XGBoost evaluation results:
XGBoost Train — Acc: 0.7519  F1: 0.0000  AUC: 0.9680
XGBoost Val   — Acc: 0.7529  F1: 0.0000  AUC: 0.9784
XGBoost Test  — Acc: 0.7416  F1: 0.0000  AUC: 0.9921

XGBoost Test confusion matrix:
[[66  0]
 [23  0]]
The backend currently returns mock tamper/clean and probabilities, so accuracy in the live app is not from this evaluation pipeline until the backend is wired to the same model or to a real ML service.
Firmware is generated in the Generate tab. The logic lives in views/generator.py, class FirmwareGenerator.
FirmwareGenerator.generate(model, version, encrypt, valid_sig).BOOT (64 KB random), KERN (zlib-compressed random data), ROOT (fake SquashFS with paths like /bin/flight_controller, /etc/config/drone.conf). Each partition has a 4-byte name and 4-byte size header.encrypt is True, kernel and rootfs content are encrypted with a custom XOR stream cipher (key derived from timestamp and model name). See _encrypt_partition.DRON, model, version, timestamp, payload size, flags (encrypted/signed), then CRC32 of the header.valid_sig is True, appends a 256-byte simulated RSA block (0xAA 0x55 + random)..bin file per run to generated_firmware/ (or the folder chosen in the UI). File name includes model, version, and timestamp so each file is unique.So: views/generator.py (FirmwareGenerator + GeneratorView) is the only place that creates firmware; no backend call is involved.
Firmware comparison is in the Research tab (views/research_view.py).
firmware_id → calls analyze_firmware(fid1, "ensemble"); same for modified file.get_analysis and emits (d1, d2) to the UI.So comparison = two independent analyses (same backend/ensemble), then side-by-side result. There is no byte-by-byte diff; the “comparison” is of the detector’s decision on each file.
Each screenshot is described below exactly as it appears in the application. Image files are in the doc/ folder.
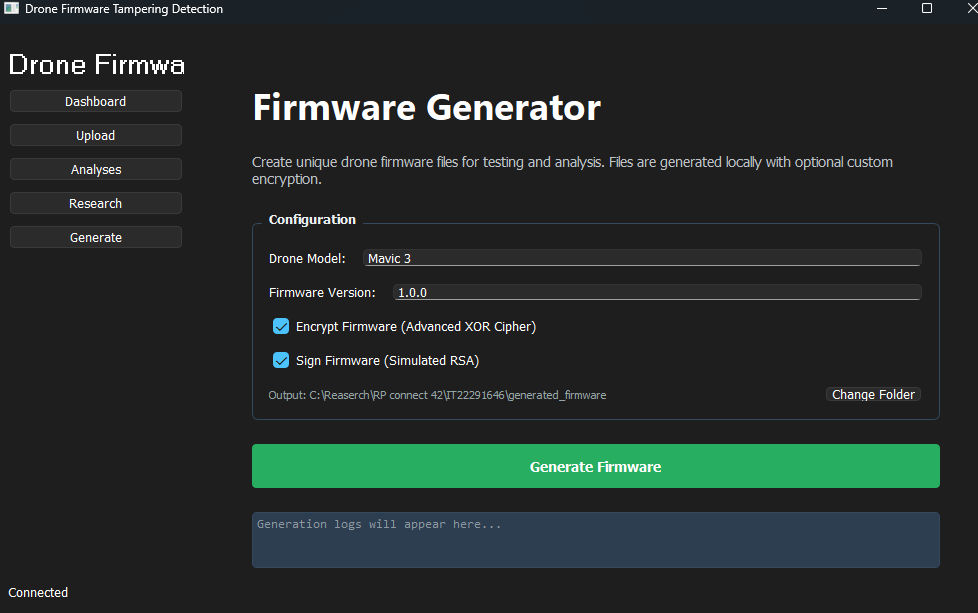
What it shows: The Firmware Generator screen (Generate tab is highlighted in the sidebar). The sidebar shows “Drone Firmwa”, navigation buttons (Dashboard, Upload, Analyses, Research, Generate), and “Connected” at the bottom.
What it explains: The configuration panel: Drone Model is “Mavic 3”, Firmware Version is “1.0.0”. Both Encrypt Firmware (Advanced XOR Cipher) and Sign Firmware (Simulated RSA) are checked. The output path is C:\Reaserch\RP connect 42\IT22291646\generated_firmware with a “Change Folder” button. The green Generate Firmware button is below. The log area at the bottom shows the placeholder text “Generation logs will appear here…” (no generation has been run yet). This is the screen used to create unique, optionally encrypted and signed firmware for testing.
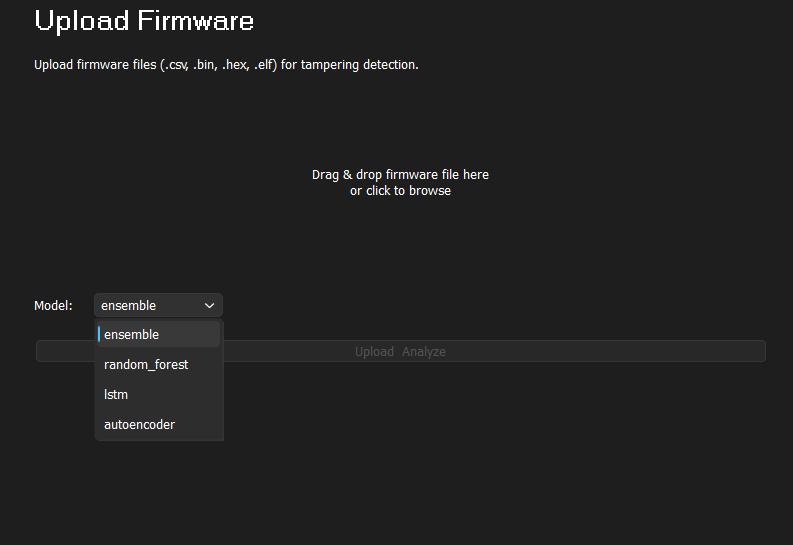
What it shows: The Upload Firmware screen. Title “Upload Firmware” at the top, with the line “Upload firmware files (.csv, .bin, .hex, .elf) for tampering detection.”
What it explains: The main upload area in the center says “Drag & drop firmware file here or click to browse”. At the bottom left, Model: is shown with the dropdown open, listing the analysis models: ensemble (selected and highlighted), random_forest, lstm, and autoencoder. To the right, the words “Upload” and “Analyze” appear faded, indicating they are disabled until a file is selected. This screen is where you choose which ML model the backend will use for tampering detection and then upload a firmware file.
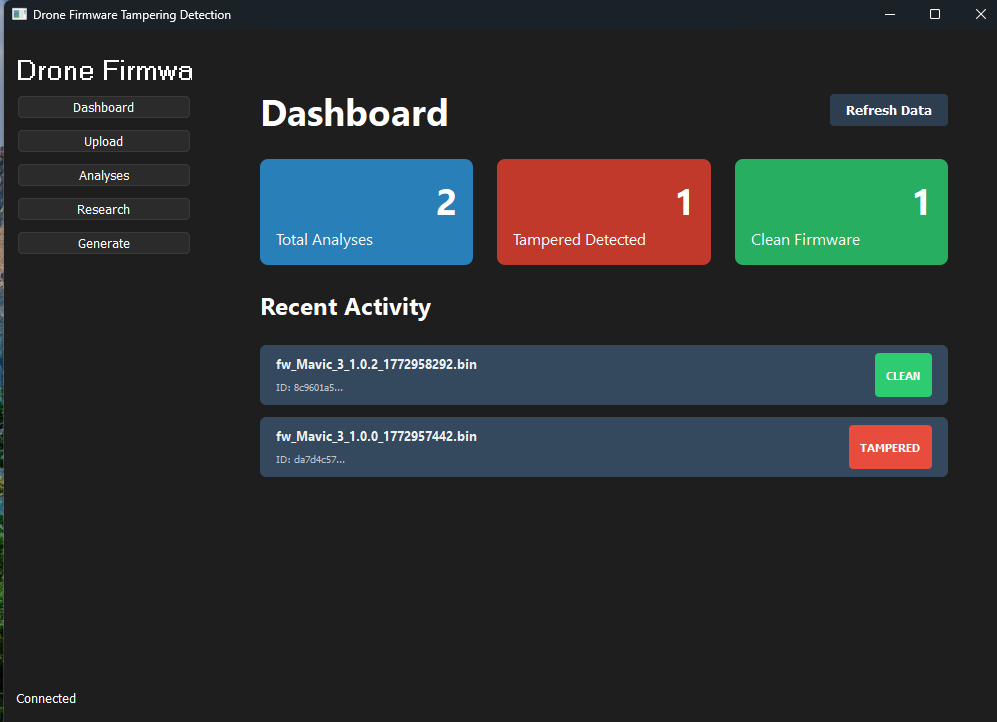
What it shows: The Dashboard (Dashboard is the active item in the sidebar). Window title “Drone Firmware Tampering Detection”; sidebar shows “Drone Firmwa”, the five nav buttons, and “Connected” at the bottom.
What it explains: The three summary cards show: Total Analyses: 2 (blue), Tampered Detected: 1 (red), and Clean Firmware: 1 (green). Under “Recent Activity” there are two entries: (1) fw_Mavic_3_1.0.2_1772958292.bin with ID 8c9601a5... and a green CLEAN badge; (2) fw_Mavic_3_1.0.0_1772957442.bin with ID da7d4c57... and a red TAMPERED badge. A “Refresh Data” button is at the top right. This is the overview of analysis results and how the model has classified each firmware file.
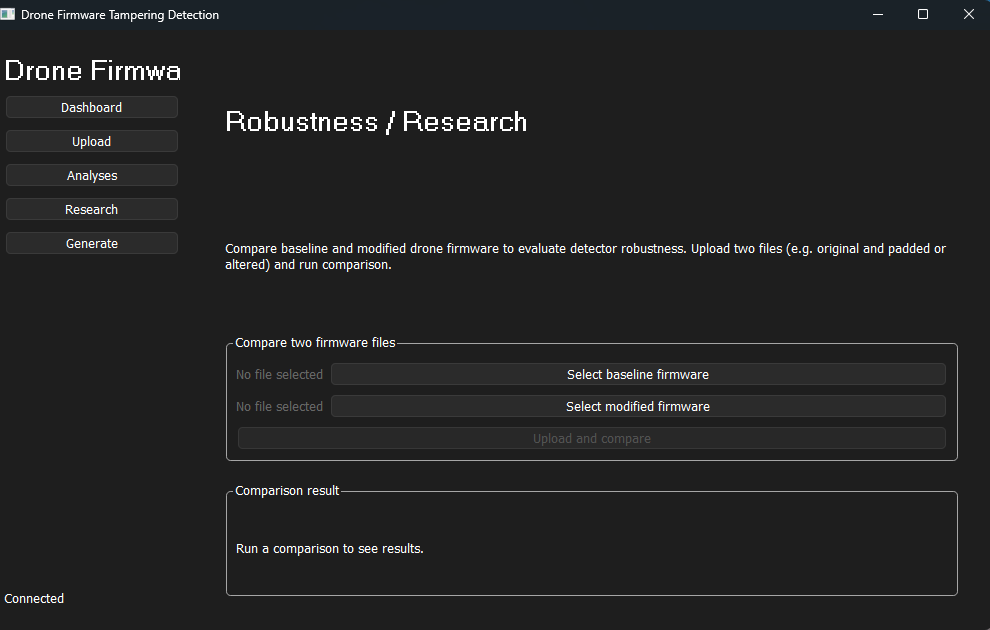
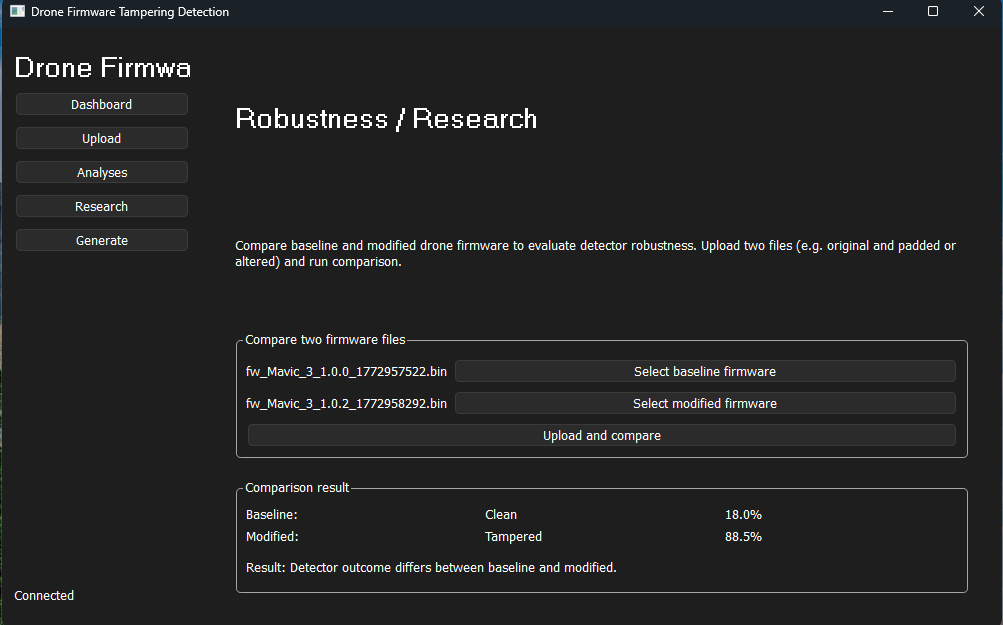
What it shows: The Robustness / Research screen (Research is highlighted in the sidebar). No firmware files have been selected yet.
What it explains: The text explains: “Compare baseline and modified drone firmware to evaluate detector robustness. Upload two files (e.g. original and padded or altered) and run comparison.” The Compare two firmware files section has two rows: both show “No file selected”, with buttons Select baseline firmware and Select modified firmware. Below that is the Upload and compare button. The Comparison result section is empty and shows the placeholder “Run a comparison to see results.” This is the initial state of the firmware comparison (robustness evaluation) flow.
What it shows: The same Robustness / Research screen after two files were selected and the comparison was run.
What it explains: The baseline field shows fw_Mavic_3_1.0.0_1772957522.bin and the modified field shows fw_Mavic_3_1.0.2_1772958292.bin. The Comparison result area now displays: Baseline: Clean 18.0%, Modified: Tampered 88.5%, and the line “Result: Detector outcome differs between baseline and modified.” So the detector classified the baseline as clean (low tampering probability) and the modified file as tampered (high probability), and the UI summarizes that the outcomes differ. This illustrates how firmware comparison works: two analyses, then a side-by-side result and a short summary.
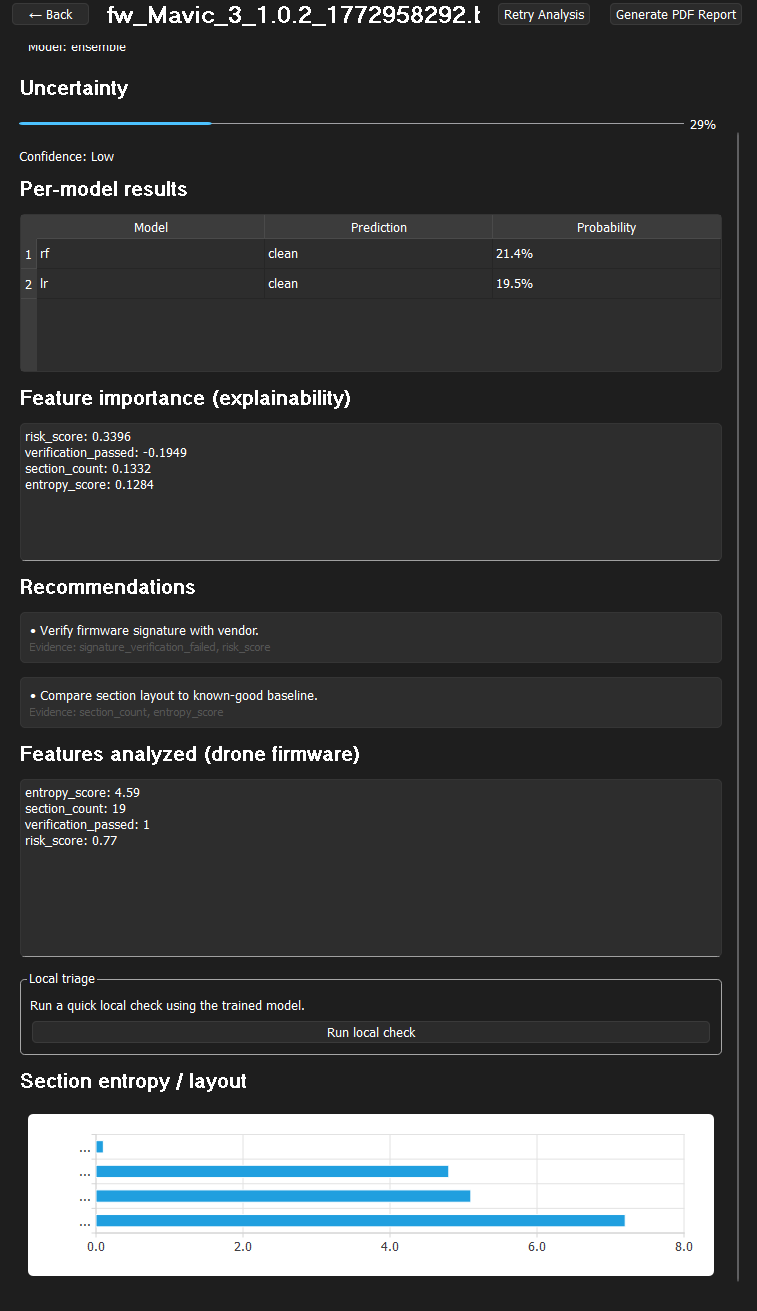
What it shows: The Analysis Detail view for the file fw_Mavic_3_1.0.2_1772958292.t. Header has “← Back”, the filename, and buttons “Retry Analysis” and “Generate PDF Report”. It states MODEL: ensemble.
What it explains: (1) Uncertainty — A progress bar at about 29% with the label “Confidence: Low”, showing the ensemble’s confidence for this analysis. (2) Per-model results — Table: model rf prediction “clean” at 21.4%, model lr prediction “clean” at 19.5%. (3) Feature importance (explainability) — risk_score 0.3396, verification_passed -0.1949, section_count 0.1332, entropy_score 0.1284. (4) Recommendations — e.g. “Verify firmware signature with vendor” (evidence: signature_verification_failed, risk_score) and “Compare section layout to known-good baseline” (evidence: section_count, entropy_score). (5) Features analyzed (drone firmware) — entropy_score 4.59, section_count 19, verification_passed 1, risk_score 0.77. (6) Local triage — “Run a quick local check using the trained model” and a “Run local check” button. (7) Section entropy / layout — A horizontal bar chart with axis 0.0 to 8.0 and several bars for section entropy. This screen shows how the model output is presented and how explainability and recommendations are tied to evidence.
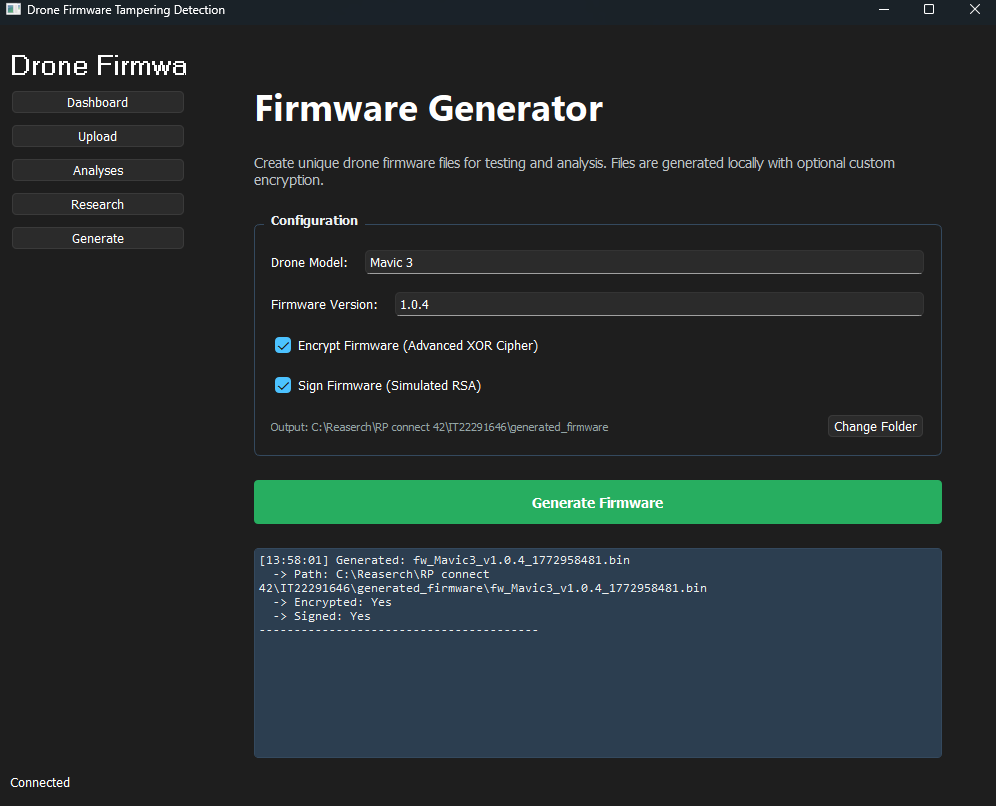
What it shows: The Firmware Generator screen (Generate tab highlighted) after a firmware file has been successfully generated.
What it explains: Configuration is the same (e.g. Drone Model “Mavic 3”, Firmware Version “1.0.4”, both Encrypt and Sign checkboxes checked, output path and “Change Folder”). The important part is the log panel at the bottom: it shows a timestamp [13:58:01], the line Generated: fw_Mavic3_v1.0.4_1772958481.bin, the full path C:\Reaserch\RP connect 42\IT22291646\generated_firmware\fw_Mavic3_v1.0.4_1772958481.bin, Encrypted: Yes, and Signed: Yes. This confirms that generation ran successfully and that the file was encrypted and signed as requested. Use this screenshot to explain the generation output and naming (model, version, timestamp) and where to find the generated file.
cd backend && uvicorn main:app --reload --port 8000python main.pydrone_firmware_training.ipynb; outputs in models/views/generator.py → FirmwareGenerator.generate()views/research_view.py → CompareWorker uploads and analyzes two files, then shows both results.